{source}
Ok, so about a month ago I found this recipe online for homemade Butterfingers. Supposedly candy corn, peanut better, and compound chocolate make for a spot-on replica of the crunchy peanut butter treat. So I was super excited to try my hand at making it. So I got a two pound bag of candy corn…you only need a pound for one batch, a 18 oz. jar of JIF honey peanut butter…you only need 16 oz. but I used the whole jar, and compound chocolate…I couldn’t find any at the store I was at but knew you could make some from chocolate chips. So with my ingredients in hand I set out to make the most awesome treat in the world…or so I thought. What’s to follow is my experience with the recipe and what I learned about it.
So first of all, I had a big two pound bag of candy corn. Nothing wrong with that right? Except that the candy corn was for Halloween…as in trick-or-treating. What does that mean? The candy corn came divided into individual baggies. I needed a pound for my recipe. So I had to sit there and cut the baggies open to get a pound. If you are doing this recipe, be sure to get the bag from the regular candy section. It’s just a bag of candy corn. You tear it open and you are good to go. It took forever to get a pound of candy corn from those baggies.
So next I put the candy corn in the microwave for a minute. Stirred. In for 15 seconds. Stirred. in for 15 seconds. Stirred. In for 15 seconds. Stirred. You’re getting the idea right? Now when you stir it be sure to fully stir because I think some of the candy was cooking on the bottom but not getting stirred and got a little hard. But yeah, so that took a little while but I got it melted, but it was quickly cooling on me, so I had to hurry and get the peanut better into the bowl. This lead to lesson learning two.
Ok, so this hot mucky orange mess in your bowl is starting to cool no sooner that microwave turns off. You have got to get that peanut better stirred in and then put it all in a pan to fully cool. But like I said, this stuff is already cooling. This is where I made my big mistake I think. When I pulled the candy corn out and placed it on a tray on the counter I had to open the peanut butter…as in take off the top and pull off the protective seal, and scoop it out and into the candy corn blob. I stirred every time I got a little something in, but this stuff was cooling fast. By the time I was done the stuff at the bottom was hard as a rock and I gave up fully blending so I wouldn’t end up with a rock in the bowl. So I quickly scooped it into a parchment paper lined 8x8 pan. Now what I quickly learned was that I should have scooped the peanut butter out into a separate bowl and have it waiting with a spatula to quickly scoop into the candy corn the second it comes out.
So I put the mess into a parchment lined 8x8 pan and put it into the fridge. I believe this was mistake number 3. Why? Because when I pulled it back out it was super hard to cut. I think if it would have been allowed to harden at room temperature it would have been easy to cut and not have crumbled like mine did. But after some hard work, and yes a little bit of sweat, I got it cut into some chunks. Now it was time for chocolate.
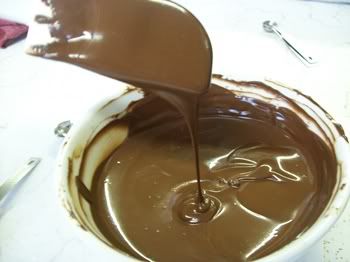
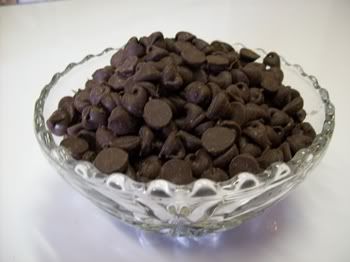 Ok, so I couldn’t find almond bark or melting chips at the store I was at, so I had to pick up an alternative that I wasn’t to happy using, but it was the next best thing. Chocolate chips. Yes, like the kind you put in chocolate chip cookies. So you’d think I would just melt them and coat my candy with it right? Wrong. Seems chocolate chips are too dense when melted. It needs some fat in there to make it flow more. Enter vegetable shortening. Yes, we are talking about the Crisco here people. Ok so here’s the recipe of how to make compound chocolate out Hershey’s chocolate chips. Ok, so for every cup of chocolate chips you have, you add a tablespoon of shortening to the mix. I used two cups of chocolate chips, roughly the whole 12 oz. bag, and two tablespoons of shortening. I pop that into the microwave and microwave it for 40 seconds and then stir. Then I put it in for 20 seconds and stirred. 20 seconds then stirred. 20 seconds then stirred. You get the idea here again right? Good. So once it was melted I realized that I hadn’t cut the peanut butter mix beforehand, another thing I would suggest. So I thought I could do it quickly. As stated above, it took a while. Well once I got it cut I was worried the chocolate would be hard again, but oddly enough it wasn’t. It was still smooth and flowing…something I must admit freaked me out a bit. Makes you wonder what that stuff does in the ol’ arteries. But I digress. Moving on.
 So here I had my nice homemade compound chocolate. I had two mini racks of yet to be coated Butterfinger bars. So I started pouring the chocolate over the bars. Mistake number 4. Dip it people. Your chocolate will go farther. I didn’t realize that until I got done with the first rack. The second rack I dipped as best I could in what was left of the chocolate…I was not making another batch. For the most part things got covered, on top. The bottoms of most of them were basically bare. So dipping surely is the best way to stretch your chocolate and get full coverage.
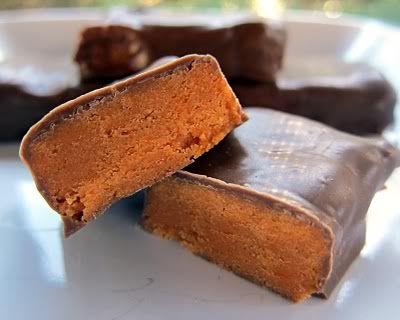
I popped my Butterfingers into the fridge for about an hour to set. I pulled them out and went to try one. Mistake number 5. People, when you are messing with candy or sticky stuff in general, coat whatever surface you are using in cooking spray or some cooking oil of some kind because it will stick otherwise. I had chunks pull off in my hand but then leave the bottoms of the chunks attached to the rack. *Shaking my head.* So I grabbed a flipper and scraped off the bars as best I could. Once off, I finally got the try the fruits of my labor. Final thoughts? The peanut better part tastes shockingly like the Butterfinger peanut butter, but it was more soft and chewy than hard and crunchy. The product as a whole? Yeah with the chocolate I wasn’t tasting Butterfinger, even though my friend swears it did taste like it. Don’t get me wrong, it wasn’t bad, it just wasn’t Butterfinger. I still have a ton left in the fridge and I planned to give it a second try tomorrow since it will have had some time to “age”, and then see if maybe I can taste Butterfinger. As it stands right now I don’t see myself making this recipe again. It just wasn’t what I expected. So now I have tons of peanut butter, chocolate chips and candy corn sitting around. Humm, well the candy corn is in baggies so I can eat those as a little sugar kick…which I really don’t need after my visit with the dentist the other day. As for the chocolate, there’s always uses for chocolate, so I’m not worried about it sitting around for too long. And the peanut butter is destined for good ol’ fashion pb&j’s. Yum. But all-in-all I’d call this experiment a mixed success. I got what I started out to make…well…sort of, and it doesn’t taste bad just not really like Butterfinger. So while it’s not 100% what I wanted it wasn’t 100% what I didn’t want. So we will loosely call this a success.
So, tell me what you think. Still want to try your own Butterfingers? Have you already done it? What did it taste like? Did you use something different from me to get the taste you got? Please share, I’d love to know. Maybe with the right encouragement I’ll be willing to give it another try…next year.
And on that note I will bring the post to close. It’s just after…4 a.m.!!! What am I still doing up?!? I wanted to craft in the morning!!! I guess that’s not happening. Oh well, early afternoon crafting is just as fun. Hope all of you have a great and crafty weekend and I will talk to you soon. Be good until then. Bye for now.
Yawning and stretching,
Michelle


0 comments:
Post a Comment